


Commercial drones make it possible to automate the entire data acquisition process, allowing to create complete digital replicas of properties within only a few simple steps. These high-resolution images can significantly reduce inspection time and improve the accuracy of the construction process.
This article is written in collaboration with Dylan Gorman. Dylan is a drone pilot with over five years of experience, mainly specializing in drone inspection using photogrammetry and LiDAR mapping. He has worked on numerous construction projects where high-resolution cameras have been essential in capturing aerial images.
Step 1. Prepare a KML file for the drone flight
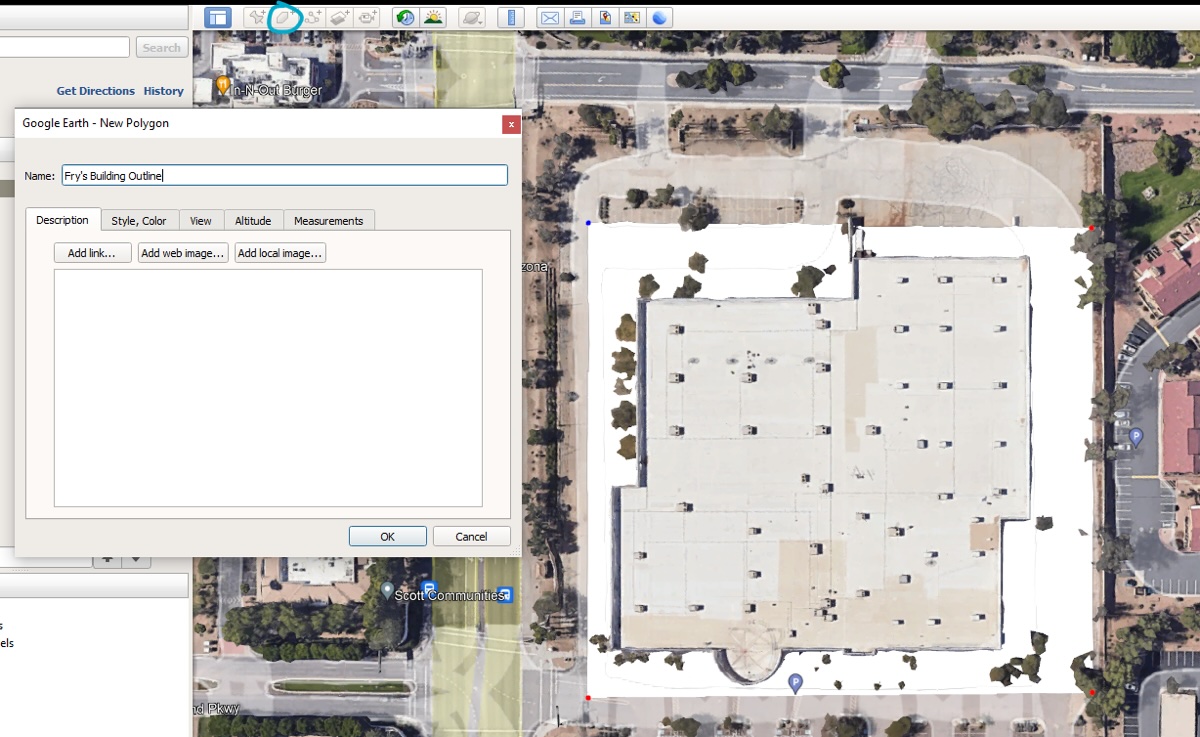
This initial step is not required but can help with flight planning later. It involves obtaining a KML file outlining the building, which includes specifications like building height and desired flight distance from the structure. Regular drone surveys can identify obstacles such as overgrown trees and the building’s perimeter fence, which can be integrated into the KML file. This file will help create an automated flight plan, streamlining the construction project and saving flight time.
Use Google Earth Pro to create a KML file for the building outline before doing flight planning.
Step 2. Creating a photogrammetry drone flight plan
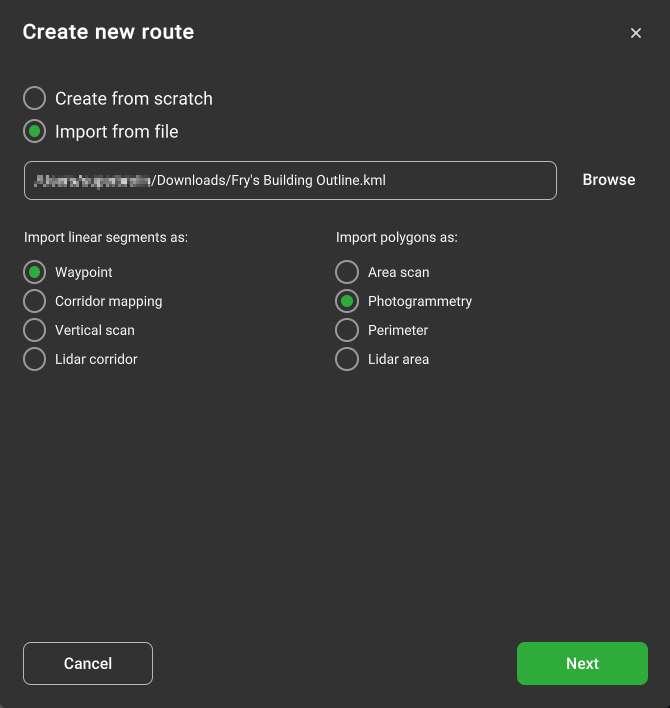
The first mission will be a simple photogrammetry mission based on the KML file. It can be created by selecting “New Route” in UgCS and in the route creation window choosing to import it from a file as Photogrammetry (as shown in the screenshot above). The mission is created automatically.
Next, a few parameters need to be adjusted.
Drone profile for the route: Mavic 3 Enterprise (select the drone model you need to use)
Camera: Wide
GSD: 1 cm (will be different depending on camera/drone used)
Overlap: 70% Forward and Side overlap
Double grid: Yes (checked)Camera tilt: 65 degrees
Also make sure to have “Set Camera by Distance” or “Set Camera by Time” action added.
When the route is calculated, make sure to check the AGL altitude in the “Elevation profile” window. The window can be opened by going to the Route card, clicking on the gear icon, and selecting “Show elevation”. Typically the flight height should be around 50 m AGL.
Remember: You should always use route parameters that best align with solving your particular task.
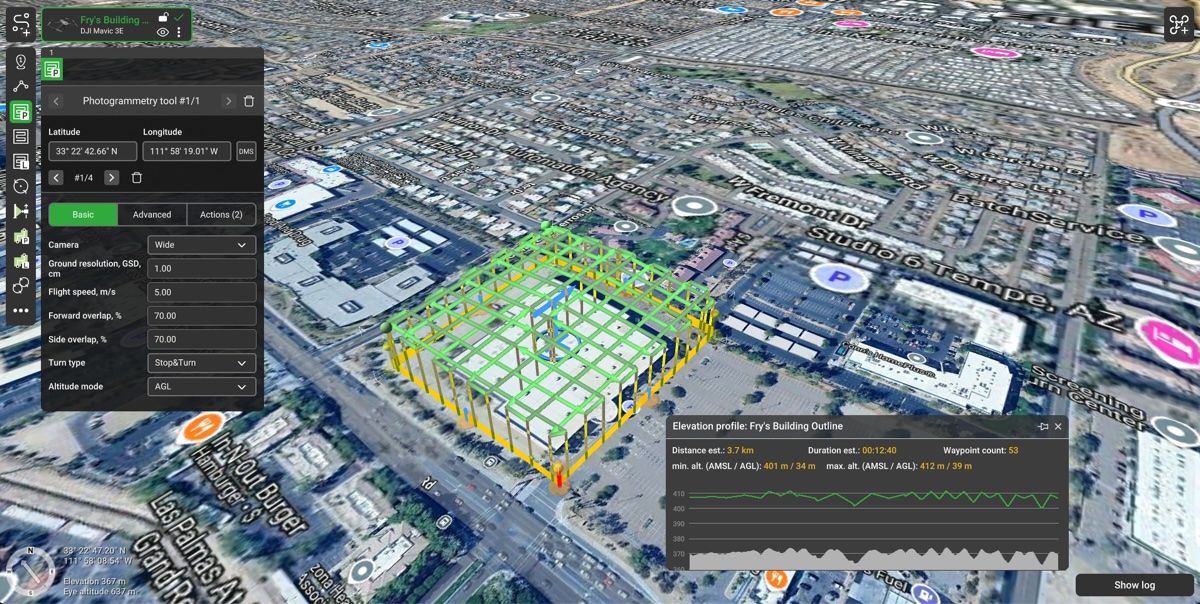
Now we have a route for the photogrammetry mission which can be flown to capture the building at oblique angles. Additionally, the mission can be repeated using a single grid and having the camera 90 degrees downwards (NADIR). This method offers a wide range of data, useful for any construction company.
Utilize the photogrammetry tool in UgCS to create a mission over the building.
Step 3. Creating a drone vertical facade capture
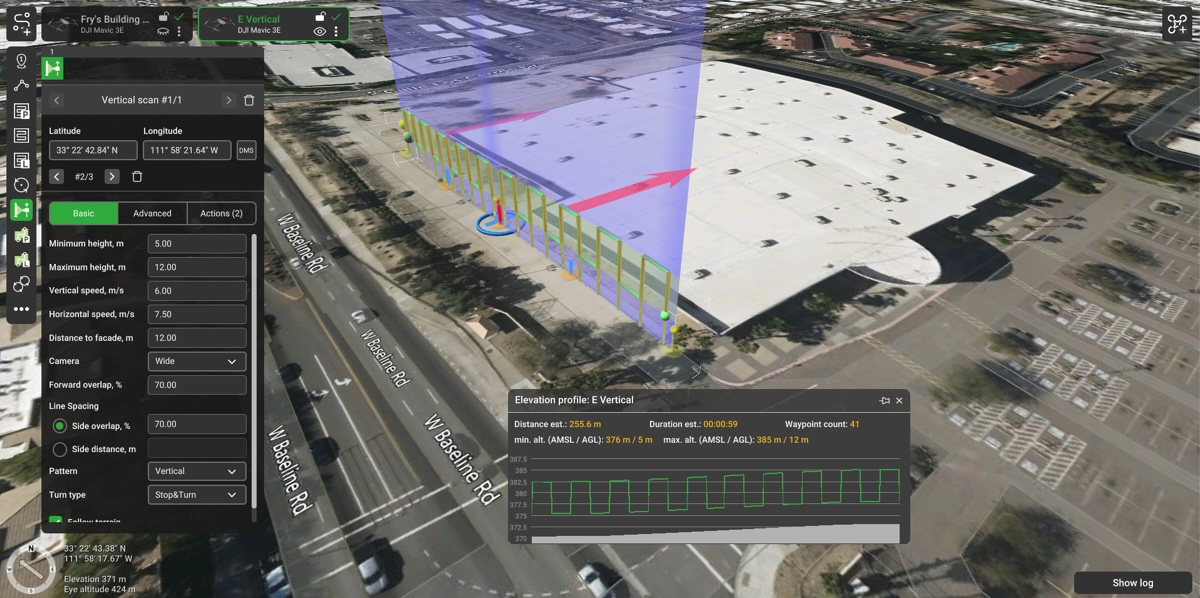
To create a vertical mission in UgCS, start by selecting "New Route" and create a route from scratch. Choose the appropriate drone model, ensuring it suits your requirements. Select the “Vertical scan” flight planning tool, specify parameters such as camera type, minimum and maximum heights, distance to the facade, and overlap percentage. This configuration allows for precise vertical building scans, capturing detailed data while following a specific trajectory based on the chosen settings. This is particularly beneficial for construction projects where high-resolution images are crucial.
In our example we entered the following parameters:
- Drone: Mavic 3 Enterprise
- Camera: Wide
- Minimum height: 5m
- Maximum height: 12m
- Distance to the facade: 12m
- Overlap (Forward and Site): 70%
You should use the specifications that best align with solving your particular task.
Use the vertical tool in UgCS for capturing the sides of the building.
Step 4. Connect your drone to UgCS and fly the mission
- Drones such as DJI Mavic 3 Enterprise, M30, M300, and M350 can be connected directly to UgCS through the UgCS Companion app. Alternatively, DJI Pilot 2 can also be connected directly to UgCS.
- Older drones such as Mavic 2 Enterprise Advanced, Phantom 4, M210, and others can be connected to UgCS using UgCS for DJI app for Android.
- DJI M300 can be used both ways - UgCS Companion app and UgCS for DJI app. Once you are connected, everything is set to upload the planned routes to the drone and capture your data, reducing inspection time and enhancing the construction process.
- Discover how to connect DJI Pilot 2 to UgCS in the video tutorial:
Step 5. Photogrammetry model creation and review.
- When the aerial images are captured, a software for data processing needs to be used. In this example ContextCapture was used but there are other alternatives such as Agisoft Metashape, RealityCapture, Pix4D and others.
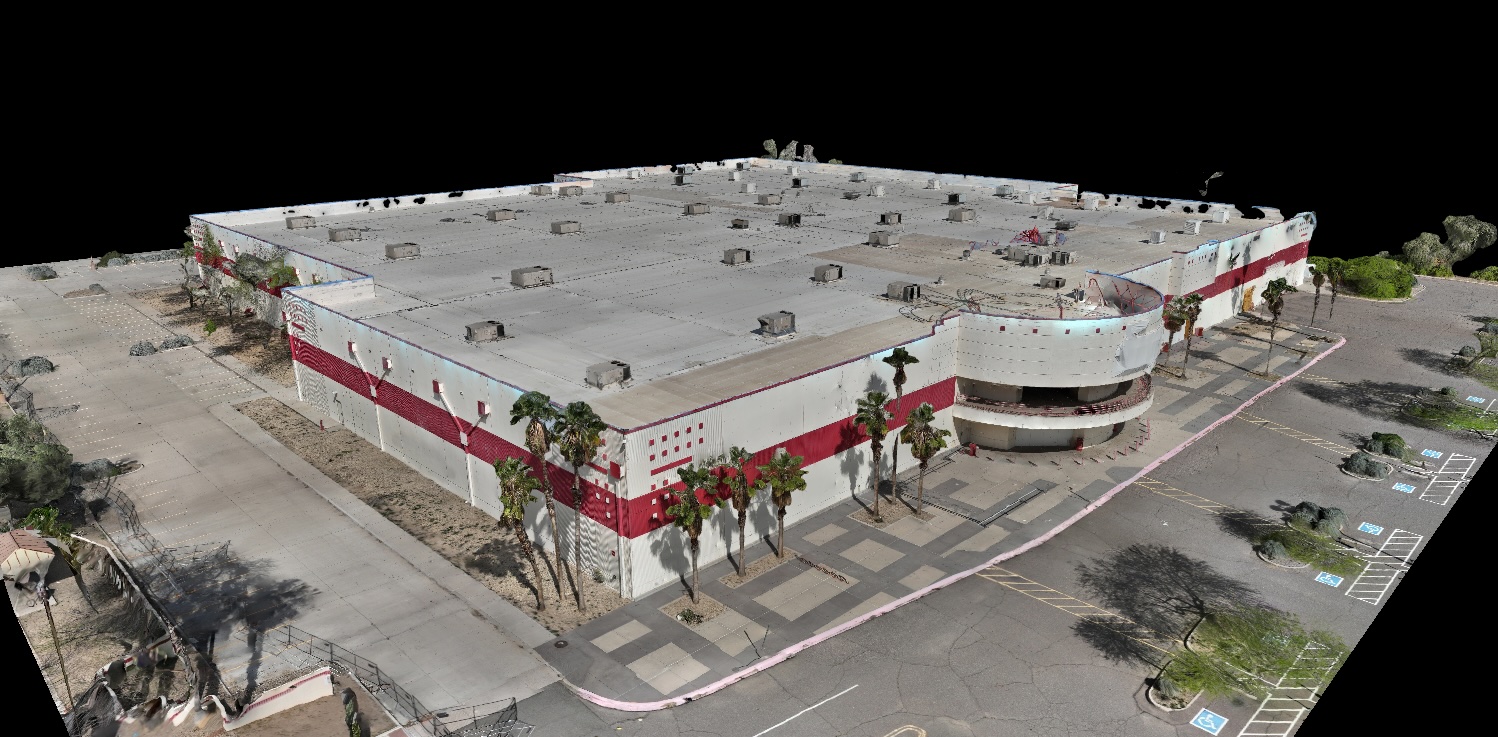
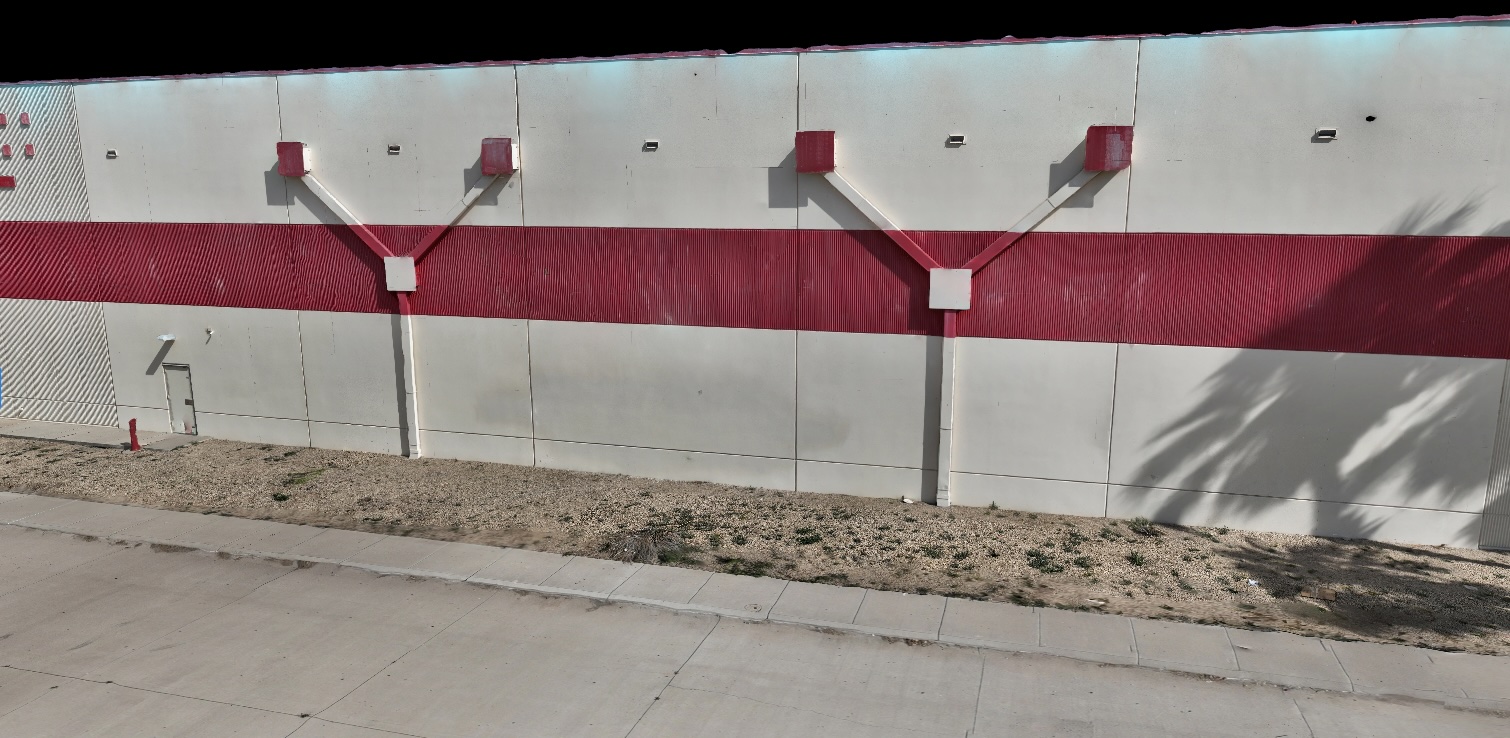
- High-resolution images generated by these tools can be used to pan around the property and easily detect defects such as tree branches that need to be trimmed, cracks, and other damage to the facade. They can also be used to track changes over time or follow the progress of a construction project.
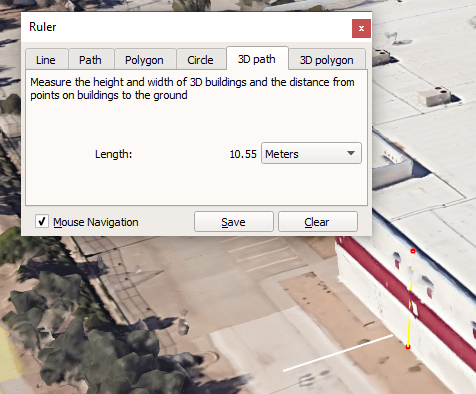
- If RTK GPS is used in the flights then, for example, with Mavic 3 Enterprise it is possible to achieve centimeter-level accuracy. This precision allows to do post-flight measurement and assessments with ease. It can be useful for architects, civil engineers and property owners, contributing to significant cost savings in the construction process.
- Modern drone technologies have revolutionized how drone services are offered in the construction industry. From reducing inspection time to capturing high-resolution images, these advancements lead to noticeable cost savings compared to traditional methods.
Conclusions:
- UgCS allows planning drone inspections quickly and with a high degree of accuracy. All flights can be pre-planned so that the drone pilot will only have to launch the drone in the field for data collection, enabling efficient drone services.
- Combining orthophoto, oblique imagery, and vertical facade inspection data allows to creation of accurate 3D models with ease.These models, derived from high-resolution cameras, can be instrumental for a construction company.
- Using RTK GPS on drones that support it it is possible to achieve centimeter-level accuracy, allowing users to make precise measurements and assessments for various purposes, such as estimating construction/repair costs or analyzing property features. This leads to substantial cost savings over traditional methods.
Get started with doing building 3D models by taking a trial of UgCS and trying it for building inspection projects.
Full video: